Introduction: A few years ago, I used some of the tactics from the author of today’s guest blog to finally hit 30 reps of strict chin-ups for the first time in my life. I was in my late 40’s and my bodyweight at the time was 191 lbs.

I had been able to consistently do at least 20 reps in a row and could work myself up over time to about 25 reps or so, but then always hit a brick wall. It was bizarre – it was like repetition number 26 was impossible.
The one technique that was most effective in helping me hit my PR was the “grease the groove” method, where I actually practiced pullups and chinups multiple times per day, every day! Might sound crazy, and it’s not how I trained for bodybuilding, but for pull-up endurance, it worked just as promised.
Read today’s guest post by bodyweight exercise expert John Sifferman to learn this and a half a dozen other tested and proven techniques to do more pull-ups. – Tom Venuto.
This post contains affiliate links to a program we use, have reviewed and recommend.
How to achieve your first strict, dead-hang pullup, your first 10 consecutive reps, 20 reps or even 30 reps, non stop…
Hi, it’s John Sifferman here, author of The Pull-Up Solution.
Pull-ups are one of the best upper body exercises that you can do, and they’re definitely the best exercise for developing your upper back muscles. If you want to build an impressive, strong back, pull-ups should be one of your go-to exercises.
Pull-ups will also build and strengthen your biceps, forearms, shoulders, and your core muscles as well. Almost ALL the experts agree on this: Pull ups are simply a great all-around exercise that should be a staple in any strength training routine – just like squats, deadlifts, and presses should be staples.
Unfortunately, most people struggle with pull-ups, and many people can’t even do one strict rep. So, in this post, you’ll learn 7 simple tips on how to increase your pull-up reps – whether you’re trying to get your first strict, deadhang pull-up, or your first 10 reps, 20 reps, or beyond – like Tom, who recently hit his personal record of 30 reps.
1. Practice pull-ups often, but not to muscle failure.
My top tip for beginners who are trying to increase their pull-up reps is to practice them often at a moderate intensity level.
Here are a couple of great options for applying this strategy:
a. The Grease the Groove Method: Perform multiple sub-maximal sets of pull-ups throughout the day, several days per week. So, if you can do 5 pull-ups max, do sets of 2-3 reps several times throughout the day.
b. Basic Linear Progression: Start by doing 1 set of pull-ups 3-5 times per week – stopping one repetition short of muscle failure (only about 90% of maximum effort). Every 2-3 weeks, add another set of pull-ups until you’re doing 5 sets of pull-ups per workout.
The more often you can practice pull-ups at a moderate intensity level (i.e. not training to total failure or burning yourself out), the faster your results will come. And if you can’t do full pull-ups yet, use some of the exercises below to work your way up to them.
2. Master the three main positions of the exercise.
If you’re having a hard time with pull-ups, there’s probably one part of the exercise that gives you the most trouble. Maybe it’s initiating the movement from the dead-hang position. Or, maybe you can pull yourself most of the way up, but just can’t get your chin over the bar. And even if you can do a few reps, you might still be weak in the top or bottom range of motion.
Regardless, you need to master the bottom, middle, and top range of motion of the exercise before you can expect to start repping out.
So, follow this basic progression to get strong in each position of the pull-up exercise:
Step 1: Master the bottom, active dead-hang position (elbows locked, shoulders engaged and stabilized) by holding a deadhang for time.
Step 2: Master the top flexed-arm hang position (elbows fully flexed, chin over the bar) by holding for time.
Step 3: Master the middle ROM flexed-arm hang position (elbows at a 90 degree angle) by holding for time.
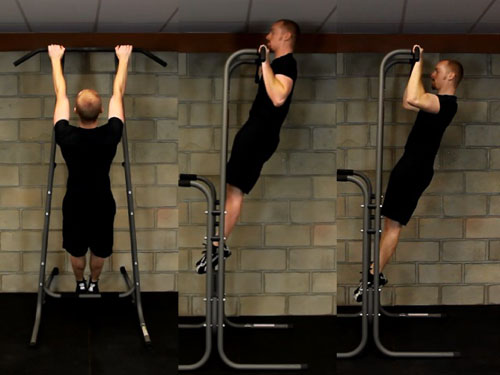
Work up to holding each position for at least 30 seconds before moving on to the next exercise.
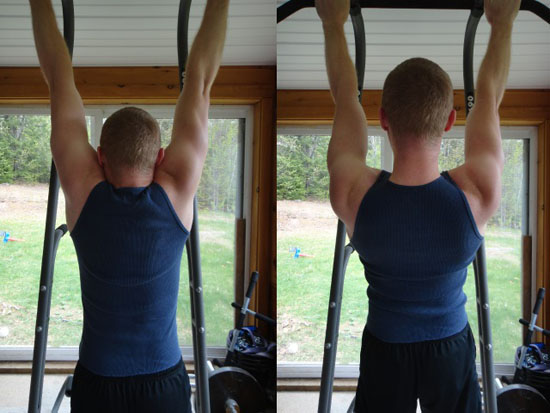
3. Learn to use your lats and core with scap pull-ups.
Pull-ups are a lot easier when you use the bigger, stronger muscles of your back and core, and the best way to train proper lat activation is with scap pull-ups.
To perform scap pull-ups, hang from a pull-up bar and get into a loose deadhang position. Your shoulders should be relaxed and extended upwards – biceps near your ears. And your elbows should be locked.
Then with a strong exhale (very important!), actively pull your shoulders down and back, “packing them” down onto your torso. You can imagine putting your shoulder blades into your back pocket. After you’ve packed your shoulders down, slowly lower yourself back down into the loose deadhang position as you relax your shoulders – keeping your arms straight and elbows locked at all times.
4. Keep your wrists straight, your elbows near your sides, your core tight, and your legs active.
Pull-ups are primarily a back exercise, and to a lesser extent, they also target the biceps and forearms. But done properly, your whole body will be integrated into the movement. Having the proper body alignment and engaging the right muscles at the right time will make pull-ups much easier.
So, make sure that your wrists hang straight down from the bar (i.e. NOT flexed, but in a neutral position).
Also, make sure that your elbows stay in tight near your ribs while you’re doing the pull-ups. Don’t let them flare out to the sides. You can think about driving them down and back to make sure that you’re tying them into your core instead of just isolating your biceps.
Finally, your core, glutes, and thighs should all remain tight, especially during the pulling phase (i.e. concentric portion of each rep), which will help with the power generation of the exercise.
If you want to learn how to optimize your pull-up technique to maximize your results and minimize the risk of injuries, check out my video on The Right Way to do Pull-ups and Chin-ups.
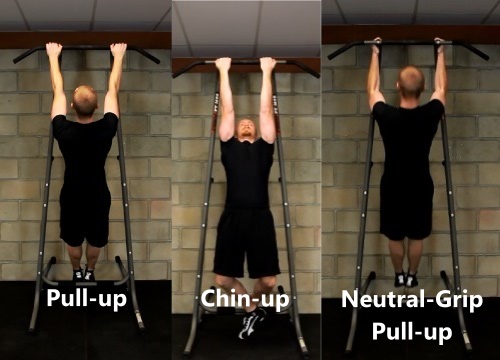
Don’t just do pull-ups. Do chin-ups, too! And do neutral-grip pull-ups on a set of parallel bars, with your palms facing each other. These are the top three variations that offer the best bang for your buck. But you can also do wide-grip pull-ups, close-grip chin-ups and many other variations – each of which will put a slightly different emphasis on your muscles.
So, try doing them with a thicker bar, hanging from a towel or rope, or on a set of gymnastic rings. Using a variety of different pull-up exercises will help you avoid burnout and also help to prevent overuse injuries. These are only the three most basic grips – there are many others, which I cover in The Pull-Up Solution.
6. Do negative reps for more strength and hypertrophy.
Once you can hold a flexed-arm hang for at least 30 seconds, the next step is to start performing negative repetition pull-ups.
You do this by getting into the top, flexed-arm hang position (use a bench or step to assist you, or just jump up to the top position), and then slowly lower yourself down to the bottom, deadhang position over 5-10 seconds. You’ll want to fight gravity every step of the way.
Negative reps will not only help you get stronger, but they’re also a very effective tool for hypertrophy, too. Even advanced trainees who can do many pull-ups would benefit from some additional negative repetitions at the end of your sets to build your numbers, and especially if building muscle is your goal.
7. Do assisted pull-ups.
If you can hold a flexed arm hang and have been doing negative reps for awhile, but still can’t do regular pull-ups, then some assisted reps may be necessary to break through the barrier.
Here are some of your options:
Lat pulldown machine (Fair) – sit down on the lat pulldown machine and pull the bar down to your upper chest, keeping your shoulders retracted down and back and your elbows in tight toward your sides.
Leg-assisted or jumping pull-ups (Good) – Use your legs to either push from a chair/bench or just use a slight jump to assist you in pulling yourself up. Then lower yourself slowly to the deadhang position (i.e. negative rep).
Band-assisted pull-ups or the assisted pull-up machine (e.g. Gravitron) (Better) – If you don’t have access to an assisted pull-up machine (that will help counter-balance some of your body weight), you can use a resistance band by looping it around a bar and stepping into it with your foot, which will stretch it out and support some of your bodyweight.
Partner-assisted pull-ups (Best) – Having a partner provide you with just as much help as you need to complete full pull-up reps is always the best option.
Just remember, whatever your skill level with the exercise, frequent practice at a moderate intensity level will almost always lead to the fastest early gains.
Conclusion
I wish I could tell you that pull-ups are easy, but there are no shortcuts to getting better at them. But if you’re patient and put these tips to good use, you’ll be repping out in no time. If you want to learn even more, check out my comprehensive pull-up training course, The Pull-Up Solution.
About The Author

John Sifferman is a health-first fitness coach and the author of The Pull-up Solution, the first comprehensive, step-by-step pull-up and chin-up training system that helps people rapidly increase their pull-up numbers in three months or less.
You can learn how John dramatically improved his pull-up performance and has helped thousands of people do the same with a unique twist on pull-up training at his website: www.PullupSolution.com.
Disclosure:
Burn the Fat Blog posts may use affiliate links to third-party websites and online stores, and earn a commission if products or books are purchased. We never recommend or link to products we haven’t used and fully endorse. However, always do your own due diligence if purchasing from a third party merchant on the internet.


This post came at the right time! I’m a 51 year old who has been trying to work up to performing my first pull-up. I will use these techniques & hopefully I will be executing a pull-up in no time. Thank you Tom for all you do!
That’s awesome, Kathy! Let me know if you have any questions – happy to help!
This may be a silly question, but isn’t being efficient counterproductive when building strength and muscle?
I know efficient is great for generating power. But I always thought the struggle is what builds strength and muscle.
Hey David, It may be a bit of semantics, but why not both? I think you can train efficiently AND increase effort in order to build muscle and get stronger. And I think this is the safest and most sure-fire method for the long-term.
Definitely agree with that. Doing things the wrong way to make them harder is a surefire way to injury in the long term.
But for pull-ups I can also see not engaging the lats in order to focus on the arms. Granted you would be sacrificing the lats but maybe that’s ok for some?
Absolutely. Just depends on your goals and how you’d like to use the exercise. For focusing on the arms, I’d go with a combination of close-grip and wide-grip chin-ups and neutral-grip pull-ups (on a shoulder-width set of parallel bars). Even if you’re engaging your lats properly, your arms will still get plenty of stimulus.
I often do chin ups for biceps focus, and I intentionally engage the biceps, physically and mentally and disengage the lats as much as I can
Hi John,
Thanks for the great pull-up article. I think I have been using my arms too much. After trying the scap pull-ups and I can really feel it.
So you never mentioned your record(s) for pull-ups. Curious if you can give Tom a run for his money… :)
Cheers,
Billy
HAHA, wouldn’t you like to know? :-)
Someone else asked me this on Facebook, too. My lifetime PR is 31 Reps. So, I just barely inched by Tom. Although, he’s got a good 15-20 pounds on me. So, his performance is more impressive. I can’t remember my 1-rep max for weighted pull-ups, but I did +90 lbs for 3 reps last year. Have also done +45 lbs for 15 reps in years past.